Monday, 26 February 2018

Make a Motorcycle with Cardboard, Straws (it rolls!!)

This might inspire you to try your own skills at modeling. This is the third time I've made this, so I worked out some issues along the way.

The idea started with monster trucks because we wanted to make some that were like the paper model which I posted earlier. The main thing with these- any vehicle-  is......
we WANT
    the WHEELS
         to SPIN! They have to roll. 💥💨

So, using bendy straws was surprisingly helpful for all the vehicles we made. To make working axles for trucks is tricky because of the problem of needing to firmly attach an axle to the wheel hubcap. This doesn't work with glue, or glue gun. Not when you DRIVE that is! It just pops right off after a short while. Instead, use pieces of straws to hold your axle to the hubcaps...... take a short-ish piece, slit the ends to form little tabs and then it's easy to tape it to the inside of the outer hubcap. Then you can slide in your axle and tape it to the straw securely. But that's another project......... 😅

Back to the motorcycle in these pictures below..... I joined the two straws above the bendy little bit (you can join straws without tape or glue by pinching one and inserting into the other) and slid the wheel right on.


Notice these go right through the wheels. Also the wheels are made from a cardboard tube which is cut to the width you want.  Make hubcaps like you would on a paper model- that is, with tabs.
From there on out it's just up to you how to design the truck or car or motorcycle.

Here are some pictures of a motorcycle.


😀😁

Make some stuff!! 
🙏


Mini Figures - Cube-ish - Soooo Many!

I'm sharing this link to excellent models with you. Today I showed it to some of my students and they can't wait to get started.
So what are you all waiting for? Get printing and cutting!!

*These models are not articulated, and they do have some tiny pieces. So I'd put this at a medium to difficult level for building.

Here's the link to download them. There are sooo many to choose from, not just Star Wars.

http://www.cubefold-craft.com/popfold/


I told you these were too good to resist. I have Luke on my shelf. Next might be Chewy?😊


😉


Hope you enjoy making a few! 🙏🙏🙏

Here are some of our models! Completed in several hours.......... R2D2 and C3PO 😎


Thursday, 22 February 2018

More Paper Houses!!

These are a continuation of ones from a previous post. I printed them out in grayscale and let the children color them. I really like the hand drawn quality to these.

These houses keep some children busy while I am making cardboard motorcycles and trucks with other students. I think I'll share some photos of the vehicles we're making as it's all recycled materials and we are doing wheels and axles and all that which is great.

For now here are  some more houses.


This was an instant hit as it has the added details of people doing things in the windows!
Save and print


So sweet.............


Such a find 😉


🙏🙏🙏


Tuesday, 13 February 2018

Birds and Koi Fish!!!

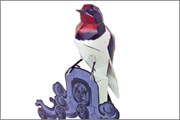
I'm so excited to share these links.  I spend a lot of time searching for great models, and then taking them over to my students in the art room. These two are super appealing and really well done. I would say these are both medium/difficult. For younger kids it might be nice to make them a bit larger. For the Koi fish I preferred only making the fish that is not curved. It is printed out on a page with a rock. There are three fish in total, and the two that are curved didn't come out as well for me. Maybe it would be easier if I tried it a bit larger, but I haven't yet.

Bird on a beautiful stand. Download the PDF files here http://www.akafuku.co.jp/fun/papercraft/


The Koi fish are on the same page as the bird. The site is in Japanese, but it's straightforward to download the pdf files for the templates and the instructions. 

Enjoy!!!! 🙏🙏

Vintage models - a Castle and Two Houses


Here are a few really nice models. I happened to come across them and tried them out right away with great results.

Right click on the images and 'save' to your computer and then you are ready to print them out.


The castle is fairly challenging, I'd put it at medium/difficult to assemble and takes a couple of hours at least. It is probably easier to assemble most of it before gluing it on to the base. Also I printed it out on A3 size paper and it's still pretty small! 


I've made the first one and it is perfect to place on my desk. I'll post a picture of it shortly. Please let me know if these files don't work! These houses are easy to assemble.
Have fun -- and look for some birds coming along in the next post!! 🙋

Sunday, 19 November 2017

Printable Paper Cars


I'm always interested in finding fairly simple but good paper cars. Here are a few new ones to try out.
This page has five Nascars and they come out just the size of matchbox or Hotwheels cars! Super easy to make. Then you can make a whole set with roads to go along with them. Found this image on a google search, but the main page is listed on the printout and you can click here to see the source which is in French. :\
http://maquettes.hautetfort.com/


Here is a paper craft blog in Russian with lots of great vehicles. Here's a sample of them you can download, and  the link to see all of them 


😀😀😀😀

Friday, 22 September 2017

2 Pokemon paper models + simple pokeball

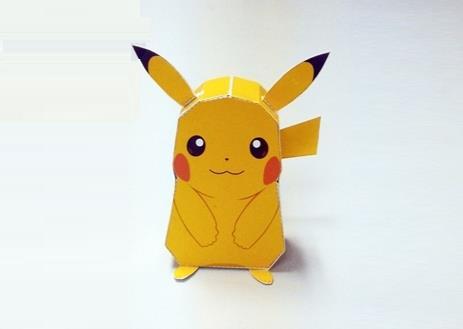
Easy to make Pikachu!! 

This paper model Pikachu is simple and looks good. It worked out really well today for 2nd, 3rd and 4th graders. The only thing is make sure you have a pokeball to go with it!! I'll include one below.
I found this Pikachu link provided by papermau.blogspot 
The downoad link is provided there, or you can save this image below.


 Here is an easy pokeball to go with it
You should be able to save that image and print it right out. I had to experiment with different programs to get it to print on a full page.

                       ****       Bulbasaur     ****


I'm working on this Bulbasaur with 3rd and 4th graders, but it's taking a bit of time because we didn't have the finished photo to work from. This one is more complicated but it looked so good I couldn't help trying it out. The tabs are really small, especially on the bulb portion so getting it to stick is a bit challenging. I wouldn't try this with younger kids.


I found the link for Bulbasaur on papermau.blogspot
The link is provided there, or you can go directly to the template download page here: http://tenpepakura.cocolog-nifty.com/blog/cat36667870/index.html

I will post more Pokemon as I complete them. This blog is intended to help you choose models which are appropriate for you needs (nothing is worse than a model that is frustrating- being either too easy or too difficult) so I try to post them only after I've made them with various age groups.

                                                       ******NEW Update **** 
If you need help with this Bulbasaur here's a really helpful youtube video of the assembly.
Assemble Bulbasaur video 


Thursday, 31 August 2017

Monster Trucks!!

Monster Truck Paper Model 

I'm posting this as it's a favorite! This truck is medium level difficulty and will even roll a bit. You can improve on the design for axles to make it even better if you need to. 


The original paper models were offered by HP but are no longer on their website.
Click on each of these images and 'save image as....' and then you can print them out.


Wednesday, 30 August 2017

Puppies and Animals!

Puppies!!! 


I've been wanting to share this really cute paper model for a while now. 


These are fairly simple to make and there's a selection you can choose from! 
I can't find the link anymore, so credit goes to the creator but here is the file. Puppy pdf


This is a very nice series of animals. These are made up of multiple parts that glue together so it takes a bit of time, but the results are worth it. The page is not in english, but it's fairly straightforward to click on the pdf download for each animal.

http://www.kirin.co.jp/entertainment/kids/papercraft/animal/forest.html 

Have fun!  


Wednesday, 9 August 2017

Assembly Instructions for Paper Robots

Assembling the Paper Robot Step by Step in Photos 

If you are wondering if the paper robot template from my last post is for you, these pictures will help  you decide. Here is a sample of how I printed out my robots. I wanted them bigger, so I divided one printout into two pages. Go ahead and print out Blue Steel! (Ignore the parts of pieces that have doubled up- you won't need those portions!)


Although there are multiple ways to put it together, this is how I did it. It takes at least a couple of hours from start to finish. 

You will need:
Printed out template
Scissors
Rubber bands
Glue
Compass or anything sharp for making holes

In the photos below, I actually enlarged the template by dividing it onto two pages instead of one. It is too small if you use just one page. About 4 inches tall. Basically make it bigger somehow! 

I started with the feet and worked my way up. I also only glued the parts closed when I finished putting the rubber bands through. This makes a difficult task just a bit easier. 

 So now the calf is connected to a foot. The upper leg goes on the inside of the calf and the knee pad on the outside, so get the rubber band through the upper leg holes first and then pull them through the calf and knee pad. 
I then connect each upper leg to the torso separately, using a knot on the rubber band on the inside of the torso for each leg. 


Next comes the neck inside the torso, and the chest on the outside of the torso. You can use one rubber band strung through all of this. The shoulder must go with the chest. Then you can tie a knot at the shoulder on each side. The arms will connect to the other holes on the shoulder pieces. 

When you pull the rubber band a bit tight the chest will bend inwards on the dotted lines. 
Next you can connect the upper and lower arms. Again, glue them after you string through the rubber bands. In the pictures I have not added the shoulder pads which are optional. They do look good though, and I added them afterwards. I also didn't use the hips which can be added last with a bit of glue.


Last you glue on the head and you're done!!! All of the robots follow this basic structure with slight differences. This should give you a pretty good idea if this is a project you are interested in. I am in the middle of assembling these with fourth graders and so far it's working out great. They chose to use one of the character templates  Blue Steel . 
Gen 1 Optimus Prime is a favorite, so that's a good one to check out too. 

I hope you enjoyed the post and that it might help anyone who is doing this for the first time!! 

If anyone has questions about models or requests let me know in the comments. 
The best way to enjoy paper modeling is to choose your templates carefully!!! There are lots of not so good robots out there. 


Don't forget about the Transformers!!


Megatron from the old cartoons! Generation 1
Jetfire or 'Skyfire' also from the old cartoons. But this character does show up in the new movies. 

Want these templates? Here is the only working link to the website
http://web.archive.org/web/20150208060336/http://www.paperrobots1999.com:80/model07.html


Don't forget about Spidey!!!


And whoa....... watch out!!!